Hope all of you had a fun Halloween. We had unseasonably warm weather, and that always makes for better trick or treating. Of course today it is raining like crazy. I do not envy the elementary school teachers today. A roomful of kids hyped up on sugar, and weather that doesn’t permit going outside for recess. A surefire recipe for headaches and frazzled nerves. Yikes!
Now that Halloween is over, I’m ready to move on to other non-holiday related projects. I know there is only a slim window before everything is about Christmas. LOL!
I have a brown leather couch in my living room. I like sprucing it up with pillows. Here are a few of my favorites:
 The problem I’ve run into is that when I swap pillows out, I need a place to store the old ones. And I’m running out of storage space! So I decided it was time I started making slipcovers instead of whole entire pillows. Now I can just switch out the slipcovers. They take up so much less space. Woohoo!
If you have the same problem at your house, I’ve written up a pillow slipcover tutorial. I included the fabric cutting sizes of the most common pillows at the end of the post. I used a canvas drop cloth to make my slip cover, because I like to add other embellishments to them. But if you are using decorative fabric, your pillow wouldn’t need anything added.
How to Make a Pillow Slipcover
For this tutorial, I used a 16″ square pillow form.
I like my slipcovers nice and tight, so I only add a 1/2″ seam allowance.
Cut one piece of fabric 16 1/2″ x 16 1/2″.
 Cut two pieces of fabric 16 1/2″ x 11″.
 You need to hem one long side of each of the pieces. Fold the edge over about 1/2″ and iron it flat.
 Then fold it over again 1/2″ and iron it.
  Now sew down the side close to the inside folded edge. Repeat with the other piece of fabric. Someone may have been in a hurry and forgot to take a photo of this step. Oops!
Now it’s time to sew the whole thing together. Place the large piece of fabric on your table. Take one of the narrow pieces and line it up flush with the left side of the bottom fabric, right sides together. If your fabric doesn’t have a right/wrong side, just make sure the smooth side of the hemmed edge is facing down.
 Take the other narrow piece and line it up flush with the right side of the bottom fabric. Again, make sure the smooth side of the hem is facing down. The two pieces will overlap each other by about 3 inches.
 Now pin the whole thing together. I like to put pins right on the hem so it doesn’t wiggle around.
 Sew around the entire square about 1/2″ from the edge. I did a straight stitch, then a zig-zag stitch to make sure the seams were sturdy. (Why the heck does my spell-check think zig zag isn’t a word? Sheesh!)
 Now trim the corners. Make sure you don’t cut through the stitching!
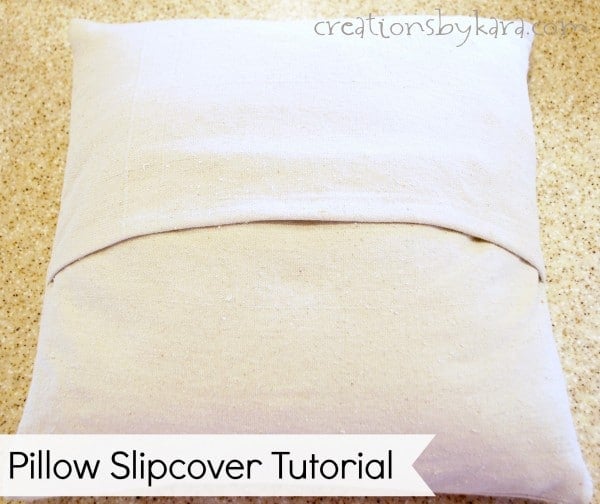
 Turn it right side out and place it on your pillow form. It will look like this on the back. See how those hems overlap each other totally covering up the pillow form? Woohoo!
 Flip it over and you have a pillow all ready to be decorated. (Of course for some projects, it’s easier to embellish the slipcover before you put it on the pillow.)
 Here’s a little sneak peek of what I did to finish off this pillow form.
 It’s for the next Creative Carousel coming up on November 7th. Can’t wait to show it to you!!
Fabric Cutting Guide:
14″ pillow: Cut one piece 14 1/2″ x 14 1/2″; cut two pieces 14 1/2″x 10″
16″ pillow: Cut one piece 16 1/2″ x 16 1/2″; cut two pieces 16 1/2″ x 11″
18″ pillow: Cut one piece 18 1/2″ x 18 1/2″; cut two pieces 18 1/2″ x 12″
20″ pillow: Cut one piece 20 1/2″ x 20 1/2″; cut two pieces 20 1/2″ x 13″
22″ pillow: Cut one piece 22 1/2″x 22 1/2″; cut two pieces 22 1/2″ x 14″
12×16″ pillow: Cut one piece 12 1/2″ x 16 1/2″; cut two pieces 12 1/2″ x 11″
14×28″ pillow: Cut one piece 14 1/2″ x 28 1/2″; cut two pieces 14 1/2″ x 17″
If you have pillows of a different size, use the following formula:
-Cut the larger piece 1/2″ bigger than your pillow form. Ex. 16″ pillow form–cut piece 16 1/2″x 16 1/2″.
-To figure out the width you need to cut the smaller pieces, divide your full length by two, then add three inches. (16 ÷ 2 +3=11)
Have started doing some embroidery.. And wow… This will help me use up all my samples.. That you..
Have started doing some embroidery since of late.. And now this… Wow. Will help me use up all my samples.. Thank you..
Thank you for these easy-to-do instructions! I’ve bought some pillow forms and am making slipcovers for the different holidays. I’m giving some for gifts too.
So glad to hear you are using my tutorial Sandy! 🙂
Thank you for posting these instructions…been looking for awhile for something like this.
Thanks so much for this tutorial… simple, well written and great photos – you make it look SO much easier than others! I am now off to have a go!
Hello
I have found a lot of useful thing on your web site. But I would really love to make a pillow slip cover with roses in one corner ( the first photo on this tuturial ). Would you be so kind and make a tutorial on how to make it?
Thank you so much and greetings from Slovenia
I have had a few people ask for a tutorial, so I really need to do one. I just have so many other projects that I can’t seem to find the time. I’ll try to get on it. 🙂
Loooooove this!!! Thanks for the inspiration… I’ll be sure to link back when I copy you 😉
Thank you Kara!
XOXO
I love these – I love them all but I really love the peace, love and joy pillows – but thank you for the tute so we can make our own! It is always a fun reminder! Thanks for linking up!
I have about 4 pillows I have been DYING to make slipcovers for after getting new living room furniture so this is amazing!! I’ll be attempting these this weekend (and we’re going to link to this post tomorrow if you don’t mind)!! Thanks for the easy to understand tutorial!
Brilliant idea. 🙂
Thanks Melinda! I just wish I’d thought of it sooner.
Thanks for sharing! Looks easy enough. Hope you have a grand evening. Toodles, Kathryn @TheDedicatedHouse
It really is easy. Took me less than an hour, and I was stopping to take photos every three minutes. 🙂