Interchangeable Book Page Wreath– the center of this wreath can be easily switched out for different seasons and holidays!
I love decorating with wreaths. Unfortunately, I don’t have endless amounts of storage space to store wreaths. Especially not a book page wreath. They practically need their own room, because they can’t have anything touching them or they get all bent out of shape. Kinda like some people I know. 😉
So. . . I wanted to come up with a wreath that could be changed up for different seasons and holidays. Enter the Interchangeable Book Page Wreath. Which should probably be called the “If At First You Don’t Succeed, Try Again. . . and Again. . . and Again Wreath”. Because I seriously messed up half a dozen times before I got it to work the way I pictured it in my mind.
Mistake #1-I planned on making it to hang on the front of a mirror in my entry way. But it ended up way too big, so I had to scratch that plan.
Mistake #2- I rolled all my book pages and stapled them, then realized that I needed different lengths for each layer. So I had to cut them and re-staple.
Mistake #3-I got all excited and glued all my book pages on, then realized I forgot to ink the edges first.
Mistake #4- Overcooked my eggs (explanation below)
And the list goes on and on.
Thankfully, all of my screw-ups were fixable, and I am thrilled with how my wreath turned out! It turned out even better than what I was imagining in my head. Don’t you just love it when that happens?
I’m not going to do a full book page wreath tutorial, because there’s already 2.5 million of them online (more or less). I’m just going to show you how I made my wreath interchangeable.
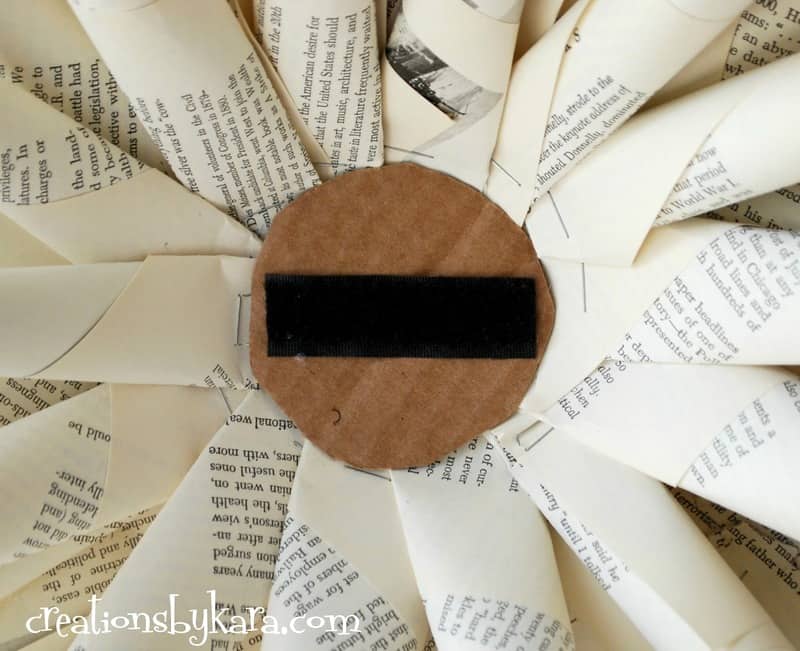
I started out by hot glueing my rolled book pages onto a circle that I cut out of cardboard. I left a space in the middle like so: Then I cut a circle out of cardboard that would fit in the middle. I attached a strip of velcro using both hot glue (on the edges) and super glue (down the middle). I didn’t want that puppy pulling off!
Since it’s spring time, I decided to make a nest for the middle. Isn’t it cute?

I started with a little grapevine circle and hot glued some moss in the middle.
I made 3 eggs out of Sculpey clay, then stamped my words on them. I then proceeded to bake them. Or I should say over-bake them. I left them in too long and they burned and turned brown. Boo. But no worries, I just pulled out my spray paint and painted them blue. Then I flecked them with some white paint. To make the words stand out I rubbed on some brown craft paint and wiped it off with a paper towel. I used hot glue to attach them to the nest.
Then I placed it on my wreath and realized it was too small and some of the staples were showing. Grr. So I hot glued some green leaves to the back. I told you this project was trial and error!
When I was all finished I flipped it over, attached a cardboard circle, and glued on the other side of the velcro strip.
 To finish it off, I just hot glued a piece of jute to the back and hung it temporarily on the door. Because I’m not sure where I’m going to hang it yet.
 But when I get tired of the nest, I can just pull it off and make a new embellishment for the center. I’ve already brainstormed a few ideas, and I sure hope they turn out just as awesome! 🙂
Like decorating with book pages as much as I do? Check out my other projects:
I love all of your book page ideas! I have tons of music sheet papers that I’m always looking for ideas to use for it. I really like how you also share your mistakes! You seem as if you’re just sitting across the table from me when I read your posts. Thanks for sharing!!
I love it! The little eggs are precious! Will be making this…
Oh yay, glad to hear it! It makes me so happy when one of my readers actually uses one of my ideas. 🙂
So clever and pretty, Kara!
Thanks my friend!
Beautiful! Thanks for linking up, I have featured you on the FB Fan Page 🙂
https://www.facebook.com/TheKurtzCorner?ref=tn_tnmn
Love your wreath! I really like that its interchangeable too. I need this wreath in my home.
I would love to have to you come over to our link party, Sunday Round Up.
Liked your facebook page so I can follow your blog.
xoxo
Heather
Muy bonita idea felicitaciones
This is such a great idea! I love it! And I love that you stapled your book pages together — I made a bookpage wreath recently and hot glued my pages together — which was not only a bit of a mess, but burnt my fingers!! 😉 Thanks so much for sharing.
Ah yes, I’ve burned my fingers with hot glue more times than I can count! Stapling did make things much quicker, and a lot less painful! 😉