Denim Flower Tutorial – a perfect way to use up those old jeans. Such a fun and easy craft project!

I noticed on my Google analytics that lots of people stumble across my blog looking for “denim flower tutorial“. I figured if that many people are interested in it, I should probably come up with one.
So here goes, my very first denim flower tutorial. I have a few others in the works, but this one is really easy, so I started with it first. Have fun!
Shabby Denim Flower Tutorial
Supplies:
-pair of old jeans
-flower pattern (I just drew one, it doesn’t need to be perfect.)
–fabric scissors
–heavy duty needle
–thread
–button or other embellishment
Instructions:
Start with an old pair of levis. Any pair will do.

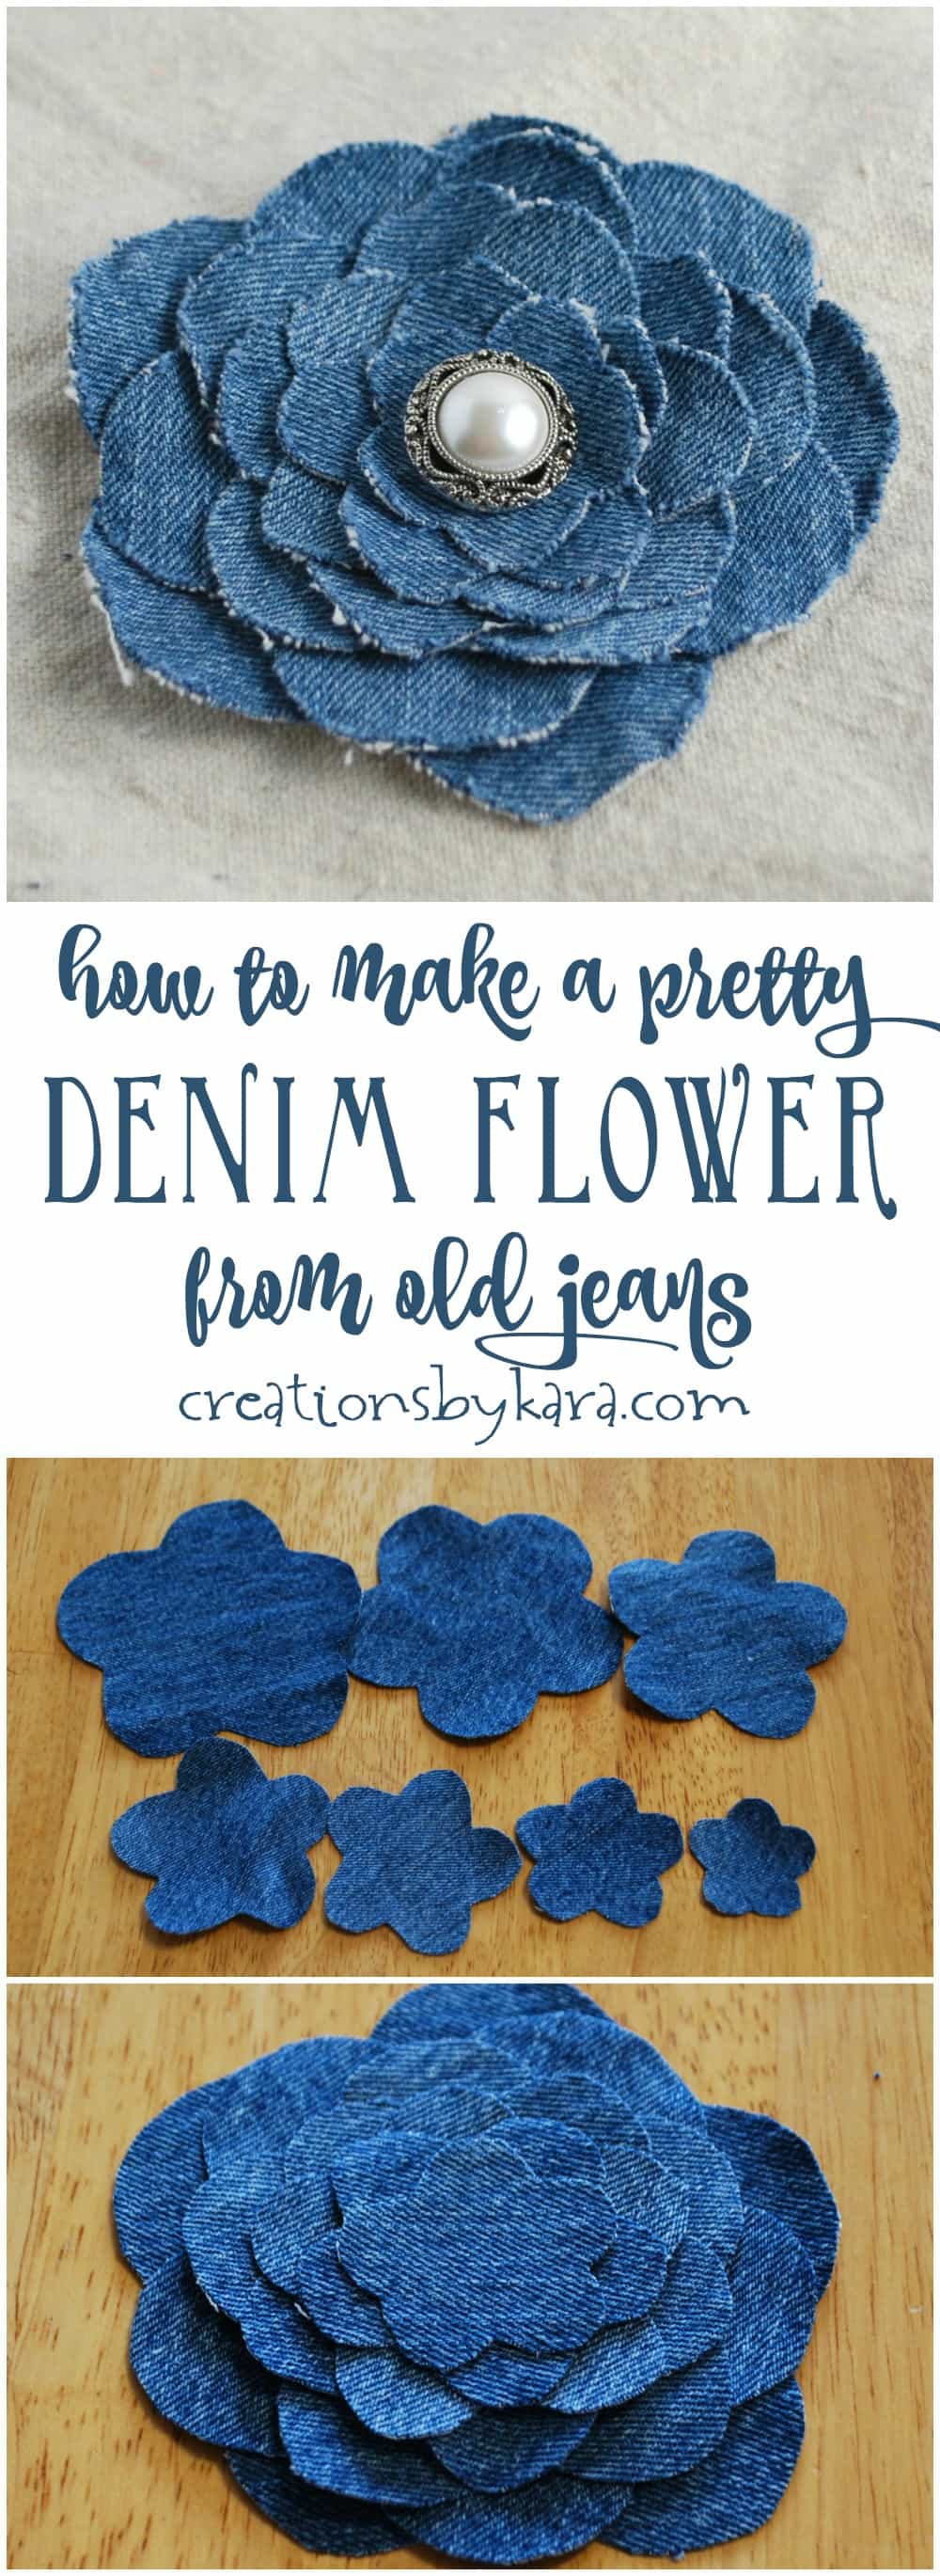
Cut out your flower patterns. I just drew one, then kept tracing around it to make it larger.

Now use a sharp pair of scissors to start cutting out your flowers. They do NOT need to be perfect. I don’t even pin my pattern to the fabric, I just lay it on, then hold it with one hand and cut with the other.

Repeat with the remaining pattern pieces.
I think it looks best to do two of the largest size, then just one of each of the other sizes. You can experiment and see what you prefer.
Now you have a whole bunch of flowers in various sizes.

Stack them on top of each other, starting with the largest on the bottom.

Now you need to sew them together. It is pretty tough to get through all those layers of denim, so make sure you use a heavy needle. Start from the back and come up through the middle.


Push the needle back down. To make it easier, I got the needle started, then put the eye on the table and pushed down. Repeat a few times till you’ve got a few stitches securing all the layers.

Next up you need to pick an embellishment for the center.
You can go casual and pick a brown button:

Or you could go girly and add a little pink crochet flower:

Use your imagination, there are tons of fun embellishments! I decided to use this pretty vintage-y button this time. I just kept stitching it on till I felt like it was secure. Isn’t it pretty?

To get a more shabby look, you need to rough it up a bit. It helps to spray it lightly with water first. See those little droplets on the table? That’s how much I sprayed. You don’t need to soak it, just get it damp.

Now squish it all together into a ball and hold it that way for a few seconds so it holds its shape.

When you are all finished, it will look like this:

If you want it even more shabby, just pull on the edges with your fingers and the denim will fray.
That’s it! Now you can add a hair clip or pin to the back and you’re all set to go! Enjoy your new beautiful flower, I bet you’ll get lots of compliments!
Love making accessories? Here are a few more fun and easy projects:
Washer Necklace Tutorial
Dollar Store Denim Rosette Headband
Fabric Flower Rings
Stacked Felt Flower Hair Clip
So I’m totally inspired. I’m way behind the date you shared this beautiful bloom but this is something that will never be outdated. From my granddaughter to my grandmother, it will be a blessing! Thanks again 💖
Aw, thanks so much Bonita! I’m so happy that you are making them for your family members. Handmade gifts are always a treasure!
I love love love this flower. Would you mind if I use this idea on my blog and give you credits?
I’m happy to have you share one photo with a link back to my website. So glad you love it!
I was looking for a few things to help decorate my small reception for country wedding . And use it for a corsage for my special guest.will post after wedding
I bet it was gorgeous as a corsage!!
I really have to stop showing up so late at the fair. A couple of seconds ago, I realized that this is a post from 2010!!!! But it definitely is still timely and adorable, so it went into my Pinterest locker right away.
Great tutorial! No more sending those old Wranglers to the second hand store!
hi kara !!! thankyou so much for tutorials i love, love love them ! keep them coming… and HAPPY HOLIDAYS TO YOU AND YOURS !!!
Thanks so much Leslie! I’ve got a few tutorials in the works right now. 🙂
I really like what you guys are up too.
This type of clever work and coverage! Keep up the fantastic works guys I’ve added you guys to my
blogroll.
hi great job
Such a cute idea! I have a white pair of jeans that got stained with something pinkish, (Just in a few spots) and I am going to try making these flowers in the white denium and maybe tinting them around the edges!!! Thanks for your help in getting my creative juices flowing!!
These are adorable, thank you for sharing this tutorial. I am doing my first craft show this Fall and I am trying to make most of my items from recycled materials. This will be a great addition. By the way, I found your blog through pinterest.
I’ve been going crazy making your cute flowers…lots of ’em! I am a cancer patient who wears hats on a daily basis and your flowers do the trick in extending my hat wardrobe!
I sew a small brooch pin (or a small safety pin depending on the thickness and size of the flower) and just pin them on! It make them so much more bright and cheery, and the same cap or crocheted beanie has infinite different looks! Love, love your designs, thanks so much!
This is such an amazing tutorial and it has sparked my imagination and creativity. I can’t thank you enough for helping me!! My friend is going to love what I’m going to make her, thanks to your help.
I would love to get various flower patterns via email..I have very little imagination when it comes to drawing anything. Please help!
I can’t tell you how much I adore this! Thank you for the fabulous tutorial!! I featured this tutorial today on my blog with a roundup of flower tutorials. Here is the link:
oopsey-daisy.blogspot.com/2010/07/wednesdays-wowzers-3-dozen-plus-four.html
Thank you so much for inspiring me. Have a wonderful day!
~Alison
Hello, thanks for visit and comment on my blog, your blog is very good, I always visit now. have a nice day and a great weekend. bjs.
I am Sooo excited to teach these at our family reunion as a craft project! It would really be helpful to have the flower patterns….would it be an option to trace them on a paper and scan them in- save them as a document or a picture and then email me them? I don’t know how to do PDF’s but this might work as an alternative?? Thanks!! ahomer55@msn.com
Hi, I wanted to let you know that I made your denim flowers and posted about them on my blog. Thanks for the great idea!
SUPER CUTE! Thanks for linking up to Anything related! ~Bridgette
I love the denim flower and I am going to work on making one today. I have a pair of jeans lying around that are just begging to be turned into denim flowers!! I’m interested in the PDF thing too…..
Thanks!!
Love it! I’ll have to try this with my kids old jeans that have holes in the knees!
Mary Ellen
That’s exactly what I did! 🙂
This looks great. Thanks for posting it. I can imagine it in all sorts of coloured denim too!
Super cute! Saw it at Someday Crafts!
Glad you like it. Thanks for visiting!
These are cute! My husband wants me to patch a few pair of his jeans, but now I don’t wanna!!! Maybe one will be “too far gone”!
Cute! Cute! Cute! I have a stack of holy levis and I will have to make something like this!!!!
Very cute! I recently made a bunch of different denim flowers, though in a different style. Love how yours came out 🙂
Super cute!
XOXO
frenchy
Cute, cute flower!! If you find out how to do the downloadable PDF thing, please share!! I’ve been wondering how to do that too!
Thanks for linking @Creative Itch’s “Sew Cute Tuesday”!
Thanks! And if I ever figure out the PDF thing, I will share the instructions. 🙂
Kara
Wait…you cook too!! So…when can you move in?
So cute!! If I show this to my little crafty 9-yr-old, she’ll want to live at your house forever. I’ll just keep you a secret!
So cute! That’s a great idea!
LOVE the new look. Congrats!
Thanks Maria!
I love this and making it out of denim is a great idea!!
Thanks Debbie! I’ve done it with different fabrics, and that’s cute too. 🙂