It’s easy to make a darling hair clip with this step by step Felt Flower Tutorial!
Valentine’s Day is less than a month away. I know. I can’t believe it either. I’ve got no less than 25 crafts, home decor ideas, and recipes that I want to try. I’d better get busy, that means I have to complete one project per day! OK, probably not going to happen. But I did get my first one finished. 🙂
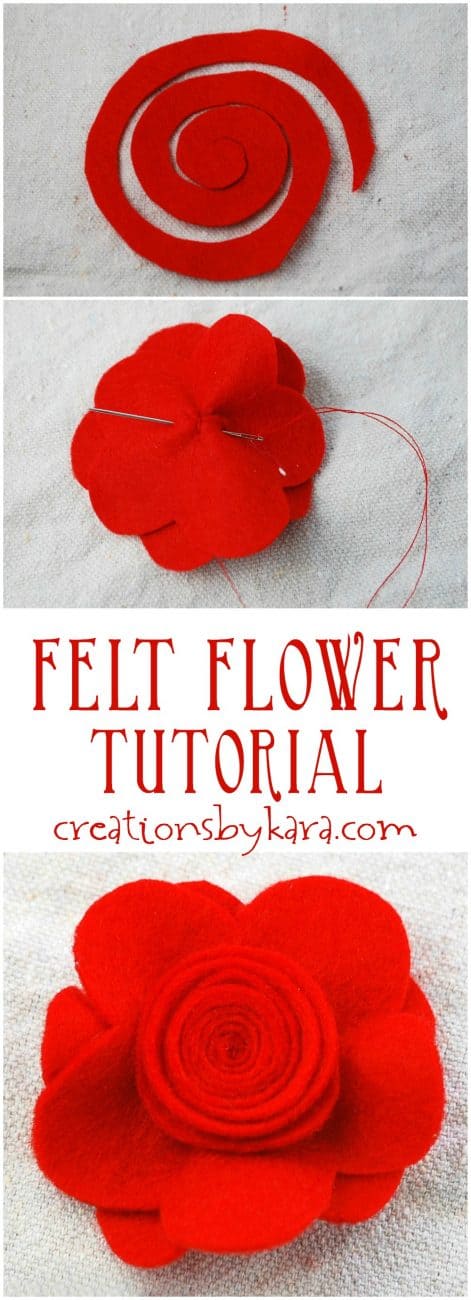
If you’ve been reading long, you know that I have a slight obsession with fabric flowers. Totally love them! I’m always thinking of new designs, and it is so much fun to make them. Today I’m going to show you how to make a layered felt flower with a pretty rose center.
In keeping with the Valentine’s Day theme, I made mine red. Isn’t it pretty?
 Here’s what you gotta do to make one for yourself. Let me know if you have any questions. Have fun!!
Layered Felt Flower Tutorial
Supplies:
Red felt
Fabric Scissors
Needle and thread
Hot glue gun and glue sticks
Alligator clip
Instructions:
1-Cut out 2 flower shapes. Mine were about 2 3/4″ across. They do not need to be perfect.
 2-Stack them on top of each other.
 3-Now you want to gather the middles together so the petals curl up all cute like. Take a needle and thread and make a big stitch in the back in the middle. (Make sure you tie a good sturdy knot.)
 4-Keep going through the same stitch over and over, pulling tight as you go. The fabric will pinch together.
 5-Repeat going the other direction. (You’ll be making an X.)
 6-When you have it like you like it, tie off the thread with a sturdy knot.
 7-Now it’s time to make the middle flower. Cut a circle about the same size as your original flowers. Mine was slightly smaller than 2 3/4″.
 8-Starting at the outside edge, cut the circle into a spiral shape. Again, it does not need to be perfect.
 9-Now take that outside spiral edge and start rolling it up. Grrr! My camera focused on the fabric in the background instead of the felt. Sorry.
 10-It will look like this as you keep going. And aren’t you glad that you don’t have freakishly wrinkly dried out hands like I do? Hanging my head in shame now.
 11-When you get to the end, there will be a tiny circle.
 12-It may be tiny, but it is very important. Take a little bit of hot glue and attach it to the back of the spiral. It should just fall right into place. Isn’t that awesome!
 It will look like this on the front:
 13-Add a dab of hot glue to the front of the gathered flowers, right in the middle. Add the little spiral rose.
 Cute, isn’t it? We’re almost finished.
14-Cut a little felt circle and got glue it on the back of the flower to hide your stitches:
 15-To make a hair clip, add an alligator clip to the back with hot glue. I like to cover my clips with ribbon, but you don’t have to.
 That’s it. You could use these pretty felt flowers as hair clips, brooches, or even attach them to a wreath. I made mine with Valentine’s Day in mind, but you can make them any size or color you need. The possibilities are endless!
And as always, if you make one, I’d love to see it. 🙂
uwoooowww… it’s so cute. thanks for the tutorial
Thanks so much!
Enjoy your creativity Thanks Trina.
Enjoy your creativity Thanks Trina
hai kara.. your tutorial is awesome .. it is simple and easy .. love it… really2 love it .. thanks kara .
this is so easy and your instructions are very encouraging–I love it that you remind us we don’t have to be perfect–at least that’s how I heard you–thanks for this gentle reassurance!! and my flower WAS perfect in its own colours and shapes! WOW!
soo pretty……. am gonna try it now i cant wait
Another lovely flower, thank you.
Thanks Carolynn!
This rose is especially cute. I love the center of the flower. I had to pin it on the CraftBliss Flower Bliss Board on Pinterest and link back to you. ~Dee
I love this idea so much! I was wanting to make a bouquet though and was wondering if you would have any suggestions. thanks 🙂
OH these are so beautiful!! Thanks for such a great tutorial (I do the SAME thing with my hands — look at them AFTER the photos and think “I should have painted my nails”!) Haha! Thanks for posting!!
Loved this one the first time I saw it too! You have so many cute girly things!
Oi coração.
Sua flor está muito bonita.
Obrigado pela partilha.
bjtos.Nile.
So cute! I’ll have to make some for V-day!
I love that design!
I made some today…I didn’t use the flower background. I was too lazy to go find a needle and thread. I just used 3 rosettes together. They are so cute. I would love to share a picture…how do I do that? 🙂
That is such a cute flower. very lovely.
Linda
Popping in from Ucreate …
Adorable! I love your sweet little felt flower. This would look so cute in in my girls’ hair.
Thanks! And if you make one, feel free to send a photo or link it up on Wedsnedays. I’d love to see it!
Super Cute! I will definitely have to make some of those! I’ve been wanting to make some flowers to add to shirts to dress them up. It’ll be so easy to attach a pin instead of a hair clip. Love it!
Visiting from UCreate!
Great idea to add them to a shirt. I’ll have to make one with a pin back! 🙂
Hello! I was stopping by from Making the World cuter and would love for you to enter my linky contest! The winner each month is showered with prizes and featured on my blog!
Thanks for the heads up Dana! I just entered. Looks like lots of fun!
I know what I am going to make with my leftover red felt. Thanks for the tutorial!
Kara- I just tried this tutorial and it is fabulous! It was so easy! I am going to send you a picture of what I made it to go on. It looks so adorable! Thank you so much for sharing your talents. Your blog is awesome!!
Can’t wait to see it!
I’ve always wanted to learn how to do this. I LOVE how easy and perfect your directions are 🙂 Thank you SO SO SO very much for sharing 🙂
You are very welcome! Let me know if you make some, I always love to see readers’ projects! 🙂
Thats different! And really cute!
these are adorable! would love to have you link them up at my hair crap party
Thanks for the heads up Kimbo! I’ve linked them and I can’t wait to see all the other great hair ideas!!
This is just so cute! Can’t wait to make one (or 20!). Thanks for sharing.
You sound like a girl after my own heart. I can never make just one of something. 🙂
Adorable! Thanks for sharing! Come link your awesome flowers to my first
“Friday Weekend Fun” Linky Party!
Have a great weekend!
love, Brenda
Thanks for letting me know about your linky party! I just added my flower tutorial. 🙂
So pretty! It makes me want to have a little girl so I could make cool hair clips! : )
If I had a little girl I just might have to make one of those. Don’t think I could pull on off on myself though. 🙂 Great idea.
That’s adorable! Thanks!
Waaaayyy cute tutorial! Thanks for sharing!
You’re welcome! Glad you like it. 🙂