
No Knead Artisan Bread . . . it only takes four ingredients to make this hearty, chewy bread. It’s delicious served with soup or just slathered with butter!
Soup and homemade bread go hand and hand. We love serving this artisan bread with Smoky Corn Chowder, Red Potato Salmon Chowder, and Zuppa Toscana Soup.

No Knead Bread
This recipe has popped up all over the bloggy world. Everyone raved about it so I couldn’t wait to try it. The problem was that you must start it a day ahead, and I kept forgetting. Seriously, it took me over a month before I finally got my act together and started the night before.
What are the ingredients in Artisan Bread?
Artisan bread only has four ingredients – flour, salt, yeast, and water!
How to make Artisan Bread:

Heavily flour your counter and place dough on it; sprinkle it with a little more flour and fold it over on itself once or twice. Cover loosely with plastic wrap and let rest about 15 minutes.

Using enough flour to keep dough from sticking to the counter or to your fingers, gently and quickly shape the dough into a ball. Generously coat a cotton dish towel with flour. Place the dough seam side down on the towel and dust with more flour. Cover with another cotton towel and let rise for about 2 hours or till doubled in size.

When you heat your oven, you heat your pot in it at the same time. Then you place the dough into the hot pot, cover, and bake it. Uncover it and bake it till it’s as brown as you like. We prefer a softer crust, so I don’t brown mine too much.

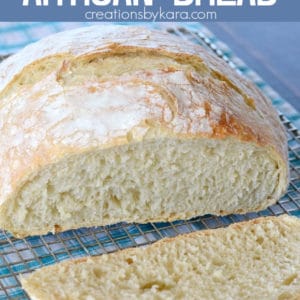
It comes out just like a rustic loaf of bread that you spend a fortune for at the bakery.
Crusty on the outside, chewy on the inside, it makes you think you are eating at an Italian restaurant. Yum!

How do I store Artisan bread?
Traditionally, it is stored in a paper bag or a plastic bag that has holes to allow for air circulation. That helps keeps the crust crunchy. We actually don’t mind our bread softening up, so I just store it in a plastic bread bag.
Because it has no added fat, it is best eaten fresh. It’s still good after a day or two stored at room temperature. It will last a few days longer, it just won’t taste quite as fresh.

It is fantastic all on its own, but it is pretty epic slathered with some butter.

You’re gonna love it!
If you love homemade bread like I do, you’ve gotta try these recipes:
Artisan Bread Recipe

Rustic No Knead Bread
Ingredients
- 3 cups flour plus more for dusting
- ¼ teaspoon rapid rise instant yeast (I used SAF)
- 1 ¼ teaspoons salt
- 1 ⅝ cups warm water about 105-110 degrees Fahrenheit
Instructions
- In a large bowl combine flour, yeast and salt. Add water and stir until blended; dough will be very sticky. Cover bowl with plastic wrap. Let rest at 12 -18 hours at room temperature.
- After 12-18 hours, the surface will be all covered with bubbles. Heavily flour your counter and place dough on it; sprinkle it with a little more flour and fold it over on itself once or twice. Cover loosely with plastic wrap and let rest about 15 minutes.
- Using enough flour to keep dough from sticking to the counter or to your fingers, gently and quickly shape the dough into a ball. Generously coat a cotton towel with flour. Place the dough seam side down on the towel and dust with more flour. Cover with another cotton towel and let rise for about 2 hours. When it is ready, it will be more than doubled in size.
- About 20 minutes before dough is ready, heat your oven to 450°. Put a 6- to 8-quart heavy covered pot (cast iron, enamel, Pyrex or ceramic) in the oven as it heats. Carefully remove pot from the oven.
- Slide your hand under the towel and turn dough over into the pot. Shake pan once or twice to distribute the dough evenly. It will look like a hot mess, but that is OK. Cover the pan with a lid and bake 20-30 minutes, then remove lid and bake another 15 minutes, until browned.
- Dump bread out and cool on a cooking rack.
Notes
Nutrition
-Recipe originally posted Jun 24, 2009, updated October 2018.
What temperature should the water be?
It should be about 110 degrees. It’s ok if it’s cooler, it will just take a bit longer to rise. You just don’t want to use water that is too hot, that can kill the yeast.
I love Artisan bread! I can’t wait to try this recipe!
Home made bread is the best!! My boys will love this!
It looks like perfection! it’s nice when baked goods can be simple and yet flavourful.
Homemade bread in just 4 ingredients? And its super tasty! WINNER!
There is something so satisfying about making your own bread. LOVE IT.
Looks so simple and love that it takes only 4 ingredients! Nothing like homemade bread!
This is our favorite bread! My husband would eat it every day if I’d make it that often!
Kara,
I love this bread and had it at a dinner party at a friend’s house on Saturday. I think I could eat the whole thing myself and it’s so easy!
I could probably eat an entire loaf myself, especially when it’s warm from the oven!
I made this last night after you posted the link on the $5dinner website Grilled Eggplant Panini recipe and WOW was this bread good. I have been making bread for about 6 months now and my husband declaired this the best one yet.