My boys love picnics. Who doesn’t, right? Food just seems to taste better when you eat it outside in the fresh air. But you know what I don’t like about eating outside? (I mean besides the stinkin’ hornets!) I hate it when you put your tablecloth on the table and the wind blows it all over the place. So darn annoying.
Today I’m going to show you how to make a tablecloth with weighted corners. No more tablecloths flapping in the wind. Woohoo!
 1-First up you need to prep your tablecloth material. (I like to wash and dry mine first.) I picked a neutral color so I could use it for any occasion, but there are so many fun fabrics you can choose! Measure your table first, then buy the amount of fabric you need. I made mine with about 8″ of fabric hanging over the edge of each side.
Going around all four edges of your fabric, fold over about 1/4″ and iron a crease.
 2-Then fold over again, and iron the crease really well.
 Set your tablecloth aside while you work on the weighted corners.
3-Cut 2 pieces of fabric that are 6″x 6″. 4-Cut them in half diagonally so you have 4 triangles.
 5-Fold the edge of one triangle down 1/4″, and iron it well.
 6-Now fold it over another 1/4″ and iron the crease.
 7-See how the corners are all wonky now? Not good. Cut off the overlapping edges of the folded down corners, so you have an even triangle.
 8-Now stitch the folded edge down using a straight stitch.
 9-Repeat steps 5 thru 8 for the remaining three triangle pieces.
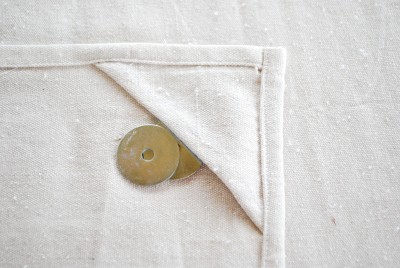
10-Now it’s time to put the corners in place. Tuck them underneath your folded edges with the smooth side up. Make sure they are all the way to the edge so that when you sew the hem edges, you will catch the triangle pieces underneath. Pin in place. And yes, if you are using a thick fabric like canvas, it is hard to get the pin into that corner. But do it anyway. 😉
 11-After all four corner pieces are pinned in place, it’s time to sew. I like to make my stitches as close to the inside folded edge as I can. And no, my stitching isn’t perfect. It’s OK. No one can see this side when you’re all done.
 12-Now you have four corners that you can weigh down in the event of wind. Which in Utah seems to be every picnic we ever have. I used washers, but if you are picnicking in the boonies and don’t have washers, rocks will work just swell.
13-There you have it. A picnic tablecloth that stays in place even if it’s breezy outside. Notice that I said breezy. If you get hurricane winds like we do sometimes, I make no guarantees that your tablecloth (and all your food for that matter) won’t end up in Timbuktu.
 And because I know some of you are going to notice–yes, there are wrinkles. I did iron my tablecloth. But someone else
 who was a little less than careful put it away. I didn’t want to take the time to iron it again just for the photo. I love you guys, but not that much. 😉
Thanks! I love easy handy tips. Pinning.
Thanks for the tutorial! Just made a great tablecloth for our tailgating table… no fall breezes will tip over the munchies now!
Just to state the obvious… (because I had to think it through LOL) don’t sew in the washers, leave a pocket to take them in and out. Otherwise when I am washing out the buffalo wing stains the washing machine will not sound like a rock tumbler… 😀
That sure would make a rukus!
Love this I made one something like it when my children were small! I also love your rag baby quilt my Grand daughter is having her first so I’m making her one!! Thank you for all the wonderful ideas!!!!
I love this! Picnics are a year-round thing here in Florida, I can’t wait to make one!