

Rolled Paper Roses . . . these beautiful paper roses are so easy to make, and so versatile! Use them for home decor, gift wrap, or craft projects.
Um, can you believe that Christmas is in four days?! Four days!!! It has been kind of a crazy month at our house. Usually I buy most of our Christmas gifts in November. But this year I knew I had over $200 in gift cards to Amazon coming, so I thought I’d wait. They took over two weeks to get here, and I was starting to panic. What if they had been stolen in the mail? Then about the time they arrived, we found out my husband’s office would be closing and everyone would be out of a job. Boy was I grateful for those gift cards!!
We told all the kids that we would be cutting back on spending until we knew if Wes would be getting a new job soon. We haven’t spent money on activities like we usually do, and we simplified neighbor gifts as well. What we have done is spent a lot of time playing games, reading Christmas stories and scriptures, and watching old Christmas movies together. It has been wonderful actually.
On Friday my husband found a new job. A great job. Awesome insurance, better pay, shorter commute, and he will be working with several good friends. And he doesn’t have to start work until January, so he will be home with the family for two weeks. We are truly blessed, and I am so very grateful. God is good.
Because we were cutting back on all spending, I didn’t get to re-decorate the mantel, make new stockings, and update our Christmas tree like I planned. That will have to wait till next year. I had to find simple Christmas projects that involved supplies I already had. One of them is actually a project that we made at my Elmers Craft and Share night. Paper flowers. They are quick and easy, and so beautiful. I’ve been making bunches of them.

Wanna make some? Here’s how.
Rolled Paper Roses Tutorial
Supplies:
-Cardstock
–Sharp scissors
–Hot glue and glue gun
Instructions:
Cut a circle out of paper. I used cardstock. (My circle was about 3 1/2″ across, and it made a rose about 1 1/2″ across.) Cut out the circle, making a wavy edge as you go.

Now take your scissors and start cutting a spiral wavy line from the outside of the circle to the middle. When you are finished, cut off the point at the beginning.

Start rolling the paper around itself. I like to start mine off by wrapping it around a nail, but that is totally optional.

Keep wrapping the paper around in a circle. I like to wrap it tight and then let it uncurl later. I have to hold my thumb in the middle so it doesn’t unwrap. See how the rose shape is forming? Woohoo!

When you get to the end, you will have a little round part. Put a little bit of hot glue on it, then press your spirals onto it.
 If you want to let it unravel a little, now is the time. When it looks good to you, press down into the glue and hold for a few seconds till it dries.
It will look like this on the back.

Isn’t it lovely?

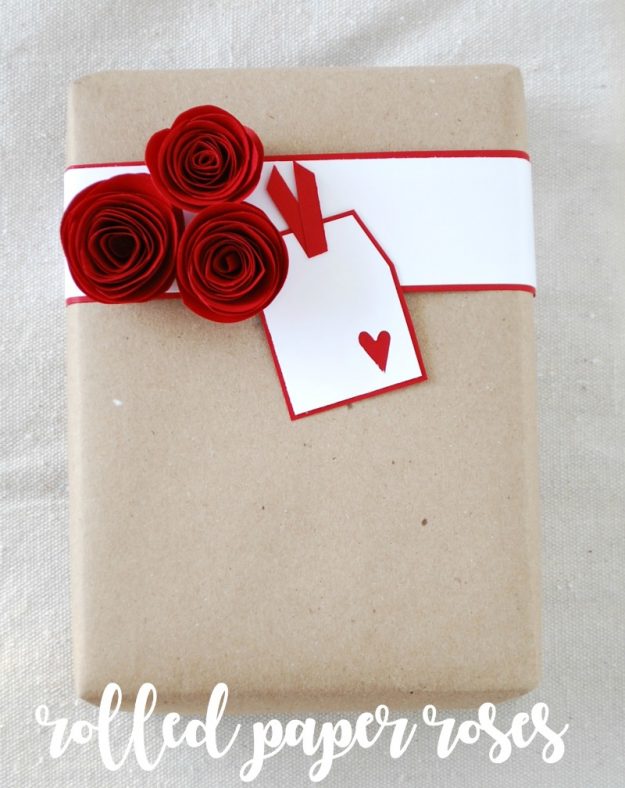
I made up several of them and used them as gift wrap embellishments. They can be used for so many things!
 For this package, I used several supplies that Elmers sent to me:
 -I used the paper trimmer to cut the white and red strips of paper that wrap around the package, as well as the tiny piece of paper on top of the gift tag.
-I used the scissors to cut out the roses as well as the tag.
-And the tape runner is super handy for wrapping presents, because it means that no tape shows on the outside of the package! It also worked great for attaching the strips of paper to the package, and for assembling the tag.
-Hot glue isn’t pictured, but I used it to attach the roses to the gift package.
I’ve got so many more projects planned with this pretty paper flowers. What have you used them on?
If you like papercrafting, check out these tutorials as well. Have fun!
What a wonderful post. I really liked it. Thanks for sharing it.
Reply
These are adorable question how do u clean them??
Reply
If they get dusty I just blow the dust off. If something spilled on them, I’d just make new ones since they are so quick to whip up. 🙂
Reply
Hi
Is there a certain brand of cardstock you use, mine seems thicker, but adorable. Making a Sunshine box.
Thank you, Kathy
Reply
I’ve made them with several brands of cardstock, and they’ve all worked just great!
Reply
thank for sharing….good job
Reply
Very beautiful flower picture. Thanks for the tutorial
Reply
Thanks so much, hope you have fun making some of your own!
Reply
I really love this rolled paper roses. Was struggling to glue it together on my first trial but then I finally to work it out. Thanks a lot for the great tips!
Reply
The first one is always the hardest! Glad you figured it out. 🙂
Reply
OMG! these are so special. I’m off to buy a bunch of red paper. Thank you for sharing these, I’m only sorry it took me this long to find them. I lve your posts
Reply
Thanks so much! Have fun making them. I find them kind of addicting. 🙂
Reply
Great tutorial! I am linking you up in my blog post about great paper flower tutorials. Thanks!
Reply
Oh my goodness! Those roses look ADORABLE on that package. I really need to get on this whole brown paper wrapping trend. So cute!
I’d love for you to link this up to my link party, Your Whims Wednesday. The party is up until Sunday! http://www.mygirlishwhims.blogspot.com/2011/12/your-whims-wednesday-39-and-features.html
Reply
Hi There- Just discovered your blog via pinterest; love this idea. Just a quick question though on the paper size you are using? Is it a 12×12 sheet of paper or 81/2×11? Wasn’t sure if that would make a difference but thought I’d ask. Thanks for the great idea!
Reply
You can use any size of paper. I get 3-4 roses out of a sheet of 8 1/2×11″ paper, but you can make them any size you like. 🙂
Kara
Reply
What a fabulous story! Thank you for sharing.
Reply
Those rosettes are great! So simple and most likely can be made from what we’ve got. I was happy to read your husband got such a great job so quickly, what a blessing. From one Kara(h) to another, Happy (simple and inexpensive) Holidays to you and yours!
Karah @ thespacebetweenblog
Reply
This is such a cute idea!! Perfect for a Valentine’s gift!!
http://www.mydailyphotojourney.blogspot.com/
http://www.facebook.com/MyCrazyBeautifulLife.13
http://www.pinterest.com/denyse13/
Reply
Beautiful! I’m happy to hear that Wes found a job so soon. I figured he would because he just seems like the kind of smart hard-working guy people would want to hire. Look forward to seeing you guys soon!
Reply
This is such a cute tutorial. I definitely need to make some of these roses now. 🙂
Reply
Those are so beautiful! I’m glad Wes found a good job so soon. See you soon!
Reply
Super cute! I will have to do this with my girls for their teacher gifts:)
Reply