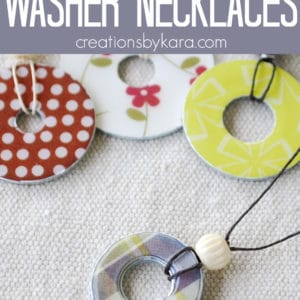
Whip up a pretty and personalized washer necklace with this step by step tutorial! They make great gifts!

I’m not a big time jewelry wearer. I don’t even have my ears pierced. (I know. A fashionista I am not.) I do however, love fun necklaces. Especially handmade necklaces. I saw some of these cute washer necklaces a couple of years ago, and I made a bunch up. I wasn’t sure it was going to work, so I didn’t do a tutorial as I was going.
Last week my cousin called and asked if I could show her how to make some. She needed a girl’s camp craft, and wanted to make these washer necklaces. So I had her come over, and this time I made sure to take pictures of every step so I could share the tutorial with you. 🙂


Washer Necklace Tutorial
What you will need:
-Washers (any size will work)
-Scrapbook paper
–Micro tip scissors or exacto knife
-Craft glue or super glue
–Glossy Accents
-Nail file
–Hemp or leather cord, or ribbon
-Beads (optional but very cute)
-Waxed paper
Instructions:
1-Pick the size of washer you would like to use, and cut a piece of scrap paper slightly larger.
 2-Punch out the circle for the middle of the washer. (I take my punch with me so I can buy washers with the size of hole the same as my punch.) If you don’t have a punch, you will have to use tiny scissors to cut the hole out. It is a little tricky, but I have done it with success. Just trace the washer on the back of your paper, make a tiny hole in the middle, and carefully cut out the circle.
 3-Place the washer on the back of your paper. Make sure your holes match up, and trace around the outside edge.

 4-Cut out your circle, and glue it to the top of the washer with some craft glue.
 Pretend like there is a pretty picture right here of the paper on the washer. Somehow I lost it. 😉
5-After the glue is dry, take a nail file and sand down the edges of the paper. This will even out any imperfections and make the edge nice and smooth.
 6-Now it’s time to add the glossy top coat to your necklace. Some people use Diamond Glaze, but I couldn’t find any, so I use Glossy Accents.
 Place your washer on a piece of waxed paper. Take the tip of the bottle and slowly squeeze a line of glaze around the very outside edge of the washer.
 7-Repeat for the inside ring of the circle. If your washer is small like mine, the lines of glaze will just blend together and cover the whole surface. Magic!
 (If you are using a larger washer, just keep adding glaze till the washer is all filled in.)
8-Look closely at your washer and make sure there is no paper showing. If there is, use the tip of the bottle or a toothpick to spread the glaze to those areas. You want it to be sealed really well.
9-Let your washer dry completely. I usually wait overnight. Now it’s time to add the cord. I usually use hemp.
 10-Cut a piece of cord about 30″ long. Fold it in half and thread the loop through the center of the washer.
 11-Pull the loop around the two loose pieces on the side, and pull it tight. You should end up with something like this:
 12-Now add a bead and use a square knot at the top of it to hold it in place.
 13-Now all you have to do is tie a knot in the top of the cord. That’s it, you are finished! Wasn’t that easy?
 You can make them in all colors and sizes. So darn fun! They make great gifts too. Who doesn’t love handmade jewelry?


How did you get the beads love to stay
In step #12, you tie a square knot at the top of the bead. That holds it in place.
This is so great! You mentioned punches-could you tell me more about what kinds/sizes you got? Anything to make things more precise on my end, I definitely do it. Thanks!
I took my washers to the craft store and matched up the size of the inside hole with the punches available. Now that I have punches, I take them when I buy the washers. You can use any size of washers and punches, you just want the circles to be the same size. Hope that helps!
This is really cute and easy to make. Gonna try it soon
I was thinking if you stored your glaze upside down, would it eliminate the problem with air bubbles? Love this idea, by the way…definitely going to make some of these for my granddaughter’s…thanks!
How does midge pod ge work on these?
I love this idea and will try it.
I don’t love the way mod podge works for these. It doesn’t leave a thick glossy finish, so they aren’t quite as pretty, and they aren’t as durable. But I have had some readers use it, so you can definitely try it if you want.
I made a couple of mine with paint samples you get for free at Home Depot, then put some alcohol ink on top of that, and they came out so pretty, although I have only put mod pudge on them so far, have to get some diamond glaze tomorrow.
Does using clear-drying glue work? I don’t have glossy accents, and can’t buy any.
I don’t recommend using glue. It doesn’t dry to a hard shiny finish like the glossy accents. A better idea would be trying clear nail polish.
Question, are these water proof?
If you make sure you cover every millimeter of the paper well with the Glossy Accent glaze, then yes, they will be waterproof.
Thanks for sharing!
You only do one side?
Yes, I only do one side. You could try doing both sides, just make sure the first one is totally dry before doing the back.
yo
Thanks for sharing your creative talents. Next time list wax paper.
Added. Thanks!
I was wondering if you could explain the sanding down part with the nail file.
I have just glued the paper to the washer, where do I start with the nail file? Is is best to go up and down with it or side to side?
Hopefully the rest of it goes well for me. 🙂
Thanks so much for sharing!!
I teachin an elementary school in CT. I saw you on the Today show during a snow day. I brought the washer jewelry idea to school as part of a fundraiser for shelter dogs in foster homes. The students (3rd graders) painting the washers with nail polish! We sold them at schoolfo 4 days @ $1 for small ones and $2 for large. We made over $400 in those 4 days! Next year we may try the fabric. Thank you fo this wonderful idea!
Wow, that’s a lot of necklaces! Glad to hear you raised so much money, and had fun making them with the students! 🙂
Made one tonight. Was so easy and fun. Will add hemp tomorrow and a bead. Thanks for the inspiration.
Love these!!! I’ve made a few now but I couldn’t find paper that I liked… however I do have nail polish that I like… I’ve been using nail polish on all my washers and absolutely love the look!!! One I used a dark blue nail polish and small silver stars I found in confetti I used recently…. that one is my favorite!!
Also! I couldn’t find the Diamond Glaze or the stuff they used here, but found ‘Mod Podge Dimensional Magic’ for another craft project, I used that instead and it works perfectly!!
Hi there! I’ve made about a dozen of these now. Thank you so much for the instructions! These are so fun!
I do have several that did not appear to dry completely or something. Even 2 months later, the Diamond Glaze is a bit foggy. Any idea how to fix that, or avoid that in the first place? I don’t know why some are foggy and some are not.
My circle cutter doesn’t reach all the way to the center of the paper circle…and it’s a small circle. So I either have to cut by hand, or I did a few with a design where there is a pattern paper down most of the circle, and a coordinating solid paper just down one edge. That way I could still use the circle cutter to punch a hole. Glue down with straight edges of papers butted together. Mod podge the two papers down before glazing.
Another trick I figured out to make cutting out the outer circles easier: cut bigger than what you need by about 1/8″, then glue it to the washer with the inner holes lined up. After the glue is dry, you can take some scissors and go around the edge of the washer. That way you can cut right along the edge of the washer without accidentally cutting it uneven or too small. Then you file it to smooth it around.
Oh, and I posted last spring about not being able to get bubbles out. I figured out a trick for that too. When I turn the Diamond Glaze down to squeeze out the glaze, hold it for a second while the air inside the tip goes up inside the bottle. If there is still air in the tip, squeeze out a drop or two on your wax paper or whatever is under your project….don’t let it unsqueeze before you move onto your washer and fill it in. If you still get bubbles, the best way to get them out is with the tip of your glaze bottle. Squeeze it a little bit, then put the tip right over your bubble and let it unsqueeze. It will suck up some of the glaze, but the important thing is it sucks up the bubble too! Then you can just squeeze some more glaze on it to replace what you sucked up.
Just some ideas I thought I’d share.
Thanks for all the tips Erica!! I’m not sure why the Diamond Glaze is still foggy. I’ve only used Glossy Accents, and I’ve never had a problem with it. The only thing I can think of is room temperature or humidity, but who knows?
Hi I tried to make these my ? is how do u get the paper to cover even the edges? Mine were very messy another problem was I could not find glossy accent I’m not sure if that anything to do w my problem any input would be great thanks!
I’m not sure if you are asking how to get the paper to cover the edges, or how to have the edges even, but I’ll do my best to answer. You have to trace around the washer, then cut out the paper very carefully. Using a nail file to sand the edge of the paper after it is glued on should help get rid of any uneven spots.
Glossy Accents is what seals the paper in place, and gives it a professional look. I know some people just use mod podge, but it doesn’t work as well. If you will be making a few of them, I’d try to buy it online. Good luck!
These are so cute! Thanks: )
I put a coordinating color on the back. Gluing both papers on first, sanding, then applying Glossy Accents and waiting 24 hours to flip and apply Glossy Accents to the other side. I usually make 2 sizes of the same color combinations so they can be layered. Lots of variations with the two washers together or separate. I also made a cut file on my silhouette cameo so I didn’t have to do the cutting myself. (I need remedial cutting classes, I think I missed that day of kindergarten.)
i remember seeing this on that Creative Juice tv show back in the day. cute
This is so easy and so clever. Thanks so much for sharing. You have a new fan in me!
Thanks so much Nancy! They really are cute and fun. Hope you give them a try!
this is awesome!! thanks for sharing — Very Sweet!!
Just made some of these for my blog and really loved how they came out. Thanks so much for your easy tutorial and great pictures!
hello
i’m from belguim
via printerest i found you
what is a ” washer” ?
lovely things you make !
sorry my englisch is not that good !
caroline
feel free to visit my blog and leave a comment
You can find them at the hardware store, usually near the screws.
Do you put the paper on both sides? I am just having a hard time seeing the back bare, sorry I am a bit OCD.
I leave the back bare, but you can finish it if you want to. You just have to wait till the front is totally cured, and be extra careful that none of the glaze drips to the front. Another option is to finish the back off with nail polish in a matching color. Have fun!
Love, love, love this idea! I’m making some now. My first two have tiny air-bubbles that I couldn’t get out. I tried popping them with a toothpick…no such luck. I tried dragging them out….nope. Got any tricks for dealing with air-bubbles?
Usually a pin worked for me, but sometimes all I needed to do was blow on them really hard. Good luck!
Thanks these really look great. Deb
Thanks Deb! Hope you try them out!
What a cute idea! I think I’ll have to make these with my niece. She’ll love it! Thanks for the great post.
http://craftrunwag.blogspot.com/
twitter @craftrunwag
This is the best comprehensive tutorial I have seen on these. We will defiantly be doing this on girls craft night. Thanks for being so thorough.
These are so cute! I’m going to have my special needs students make the to sell to raise money for a field trip. Thanks for sharing!
Super cute tutorial! Thank you for sharing:)
So adorable! And I love that you use a circle punch to cut out the center. I’m headed to the hardware store right now!
Have fun with them! And yes, being able to punch out the centers is a huge timesaver!
So cute, I’m going to make some. Question, did you also put scrapbook paper on the back of the washer?
I love this idea! I’m having trouble with the glossy accents turning yellow when it dries, and air bubbles popping up. Any ideas?
I never knew you could create a beautiful piece of art from a washer! That was a fun tutorial, thanks very much for sharing this with us!
I got stuck pretending there was paper stuck on the washer after you put the glue on…
LOL!
These are so cute; thanks for sharing and spurring on my sometimes stagnant imagination.
Thanks so much for this! We love it! Our women’s church group will be making about 75 today for gifts. Great idea.
Thanks for the tutorial! I tried this last night, but this morning I found that I had a lot of air bubbles. What can I do to avoid the air bubbles. I didn’t notice them last night when I applied the glaze. Thanks!
Wonder if you could make the washers interchangeable like the bottle top necklaces? Great tutorial! Thanks for the inspiration!
i made 3 this afternoon, and i walked away knowing they need to dry for a long time. i come back maybe an hour later and my glossy accents has run off my washers! 🙁 i wiped it up some but my nice smooth finish is no more. has this happened to anyone else? ty
I found this tutorial on Pinterest this other day and made some necklaces this weekend. They were so much fun!! I blogged about them todya and linked back to you.
Thanks so much for shraing the tutorial!!
These are adorable. Each Christmas I try to come up with a new idea for making a project with my 4 grandgirls. Then they have something nice to give their friends for the holiday. They love working with all of us together and since I buy all the materials, it’s no cost to them.
Thanks for the great idea!
These are so cool and easy. I found your link from tipjunky. I think my daughter and I will try and make these for teacher gifts.
I have been making a bunch of these with different variations and have linked back to your sight for your awesome tutorial. Thanks so much!! 🙂
I’ve seen this done before (a long time ago–it’s awesome)! Thank you for linking up last week at Sew Woodsy! Please come back tomorrow and link up your most recent project!
Cute!!! I’ve been stamping letters on washers lately. I think this would be fun on the other side. 🙂
This is super cute and super easy, I love it
What a fun and creative idea:)
what a cute idea something that I could get my daughter and her friends together before school starts
come see me at http://shopannies.blogspot.com
What a great idea! They are super cute!
So beautiful! And for only the cost of a few supplies. What a great way to use up leftover scraps of decorative paper. I am definitely going to need to borrow this idea! I found you over at Someday Crafts. My girls will love making these when they are older so thanks for the inspiration!
Lovely necklaces!
So cute! I love all the color combinations!
That’s the hardest part for me-picking the paper. So many choices!
These are super cute!
These look great! My daughter has been making these for her friends.
Emily
domesticdeadline.blogspot.com
So fun. I bet they are loving her!
Love these! I made one a while back and used leather as a necklace. I didn’t want it too long, so I am still searching for something to use on the ends to clamp to the leather. Someday I will wear it! *sigh* I love how you added a bead to the end of yours too! Beautiful!
I’ve made a few with ribbon and used magnetic clasps on the end. I wonder if that would work with the leather?
LOVE love love this! So pretty!
How cute are these?!?! Thanks for the great tutorial! I would love if you would come link up to Saturday Social!!
http://socialsalutations.blogspot.com/2011/07/saturday-social-week-8.html
Darn, I didn’t make it in time. The linky list was already closed. I’ll have to try again next week. 🙂
So cute! I think it will be a fun summer afternoon activity when my oldest is driving me nuts. 🙂
xoxo,
Amy
Watch out, because they are very addicting! 🙂
I love these such a cute gift project!
Thanks for this timely post Kara! Just in time for our Beehive activity last night. The few girls that showed up were very excited about what they made. You might see a few at church on Sunday 🙂
So glad you used my tut, how fun! I wish I would have seen some of the girls on Sunday.
Cute & simple, the best kind of project! Thanks for sharing!
Thanks for the fun tutorial! Can’t wait to try these! I shared on my Treasures for Tots FB fan page too: http://www.facebook.com/treasuresfortots
I like the addition of the bead, it’s a nice finishing touch! My fave is the big polka dot one. Thanks for linking up with DIY under $5!
Those are so cute! I want to make some!
they look great and I bet the were fun to make too!
These are so fun! A great project for kids this summer! My son also used washers to make a wind chime at scouts, and this would be a good way to dress them up!
Hi
I love these washer necklaces and the wind chimes sound interesting too, do you mind explaining how they were done, I’m doing crafts at a children’s camp in a few weeks and like the idea!
Thanks
Gilly
Sorry I forgot to add my details!