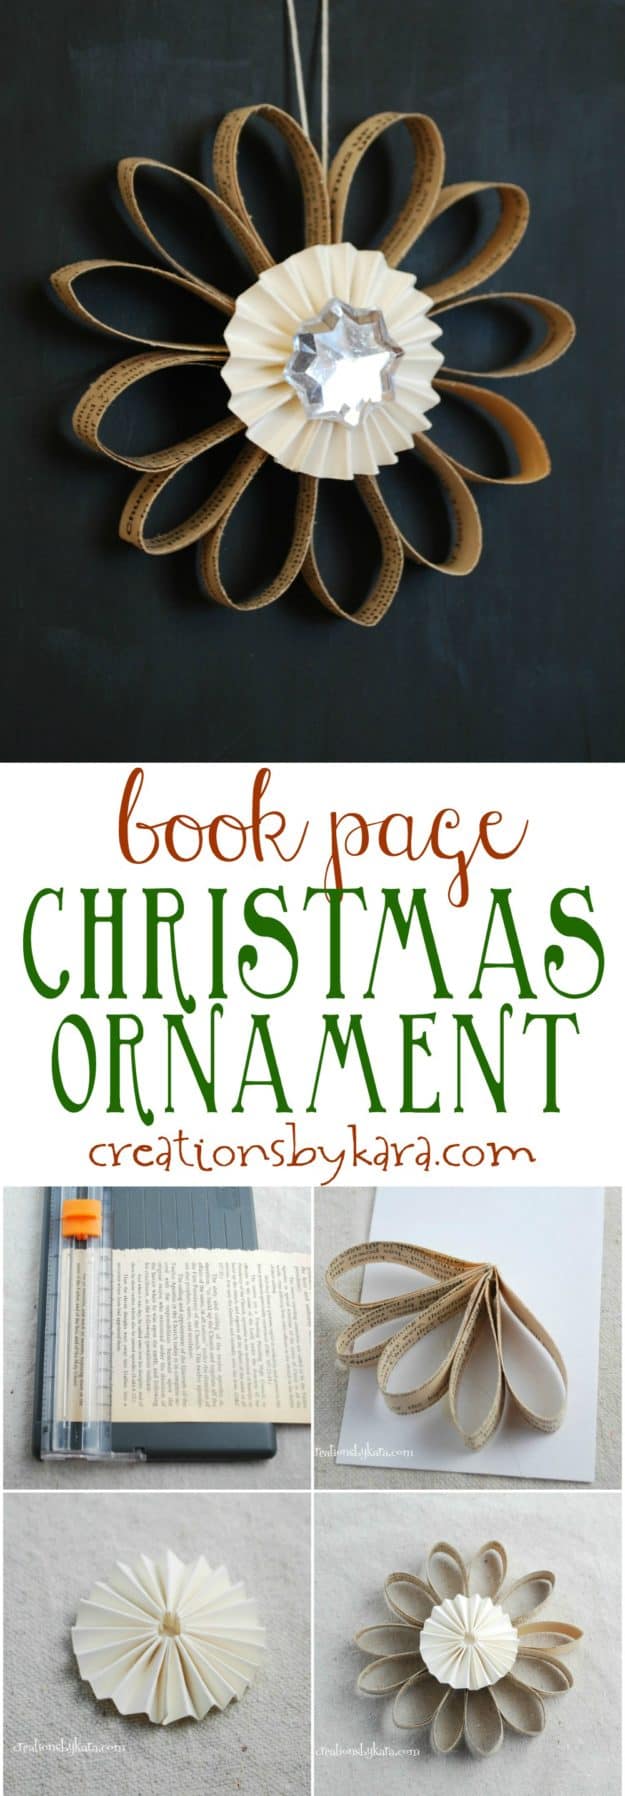
With just a few simple supplies, you can whip up one Book Page Ornament, or a whole set!
Dear Thanksgiving,
I know I totally said I wasn’t going to skip over you and go right to Christmas. But with Christmas music playing on the radio I just can’t help but get in a Christmas-y mood. Please forgive me, I can’t help myself. I promise I will give you more attention in the coming days.
Sincerely,
Bitten by the Christmas Bug
I shared this book page Christmas ornament at Positively Splendid a couple weeks ago, but in case any of you missed it, I wanted to share it here as well. I think it would also make a darling embellishment on a gift. Or if you wanted to, you could make it much larger and use it like a wreath. You choose. 🙂

Supplies:
-Vintage book (I find them at libraries and thrift stores)
–Paper cutter with scoring blade
–Stapler and staples
–Hot glue gun and glue sticks
-Cardstock
-Embellishments (glitter, chipboard, gemstones)
-String
Instructions:
1-Take a small stack of book pages (I used three), and cut them into 1/2″ strips. This is much easier if you have a paper cutter.
 2-After you have 12-18 stacks cut, staple each one of them together right at the bottom.
 3-Add hot glue right at the end and start attaching the loops together.
 When you are done you should have something like this. I used 12 loops in mine, but you can use more if you want.
 4-Now it’s time to make the paper medallion for the middle. Take a 12″ piece of cardstock and cut it 3/4″ wide. Score it every 1/4″, and fold it up accordion style.
 5-Put double sided tape or glue on one end of the strip, and attach both ends together. You will end up with a circle. An uneven circle, but a circle. 😉
 6-Now cut a little circle out of cardstock. Mine was about 1″ across. Put some craft glue in the middle.
 7-Now comes the tricky part. You have to push down the middle of your folded circle so that it will lay flat. It will not want to cooperate. Just remember that you are bigger than it, and you can force it! Stick it on top of the gluey cardstock circle and use something to weigh it down as it dries. I used my jar of glitter. Which is actually an old spice jar. Very handy.
 After you are sure that it is dry, take off the weight, and you will have this:
 8-Hot glue it to the center of your loopy flower:
 9-Add an embellishment to the center. I hot glued a clear gemstone on mine. You could also use a brad, button, or chipboard. Whatever you like!
 10-Add a hanger to the back. I cut a piece of thread 10″ long. Put it in the middle of the back. Then cut a piece of cardstock, cover it with hot glue, and put it over the string, sandwiching it in the middle.
 Tip: My ornament fell forward when I hung it, so I pulled apart the top two loops, put a dab of hot glue in the middle, and pushed my string up into that glob. Much better!
 Here it is all finished:
 I also tried a couple more variations. One with a silver snowflake brad in the center:
 One with a chipboard star that I covered with glitter:
 And one with a chipboard flower in the middle:
 Which one is your favorite? Do you make ornaments for your tree, or do you just buy them?
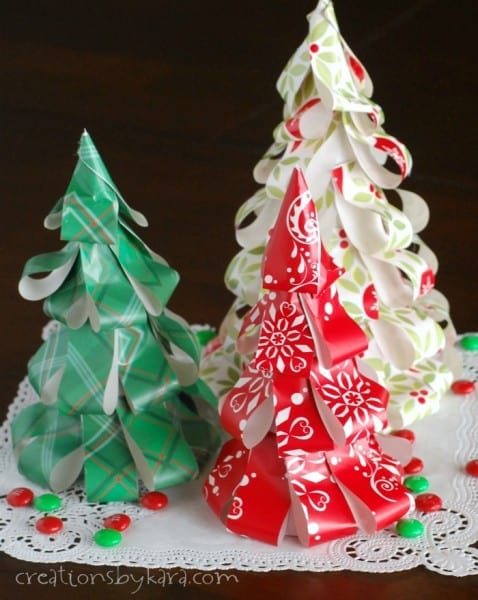
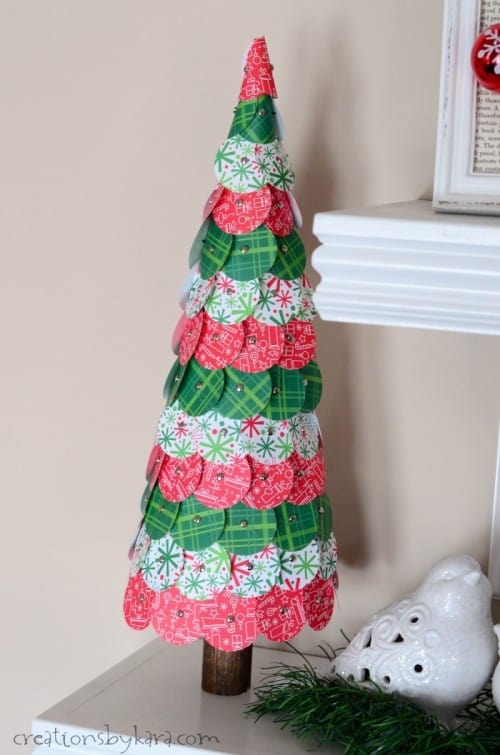
Here are a few more simple Christmas projects:
Book Page Christmas Tree Banner

Wrapping Paper Christmas Trees
Circle Punched Christmas Trees
Hi. How about mushrooms made with book pages? I saw them and wanted to make some, but couldn’t figure it out. I know we are all short of time but, if you could please take a look at doing a mushroom or two, that would be fabulous. I couldn’t figure out how to keep it together on the top part. Maybe it’s made in two pieces. Thank you!
Great tutorial! Thanks! Merry Christmas!
You are so welcome. Hope you had a wonderful Christmas as well!
I went to this initially because it was very pretty but was appalled, shocked, disturbed to see that the very book you used to cut up and make a Christmas ornament was from the Bible!!! Please cut up something else other than the very meaning of Christmas! I have seen this same ornament using flattened cardboard from a paper towel roll…or may I suggest newspaper or card stock, but not the Word of God who gave us Christmas.
Yikes, I actually didn’t use a Bible. I could never cut up my scriptures! But even if the thought didn’t bother me, Bible pages are much too thin and wouldn’t work very well anyway.
did you see on the SNAP blog today? almost exactly like yours!
Wow! You are a Christmas crafting genius! So glad I found your project via Centsational Girl.
Please stop by for a visit to my blog. I am currently in the midst of a Gifts to Make series.
Be Merry and Bright!
I absolutely LOVE this ornament!
Thanks so much Katie! I love it when a project turns out just as good as I envisioned it in my mind. 🙂
visiting from Positively Splendid- what a fabulous idea! love any craft that involves vintage book pages 😉 (your bookpage pumpkin is TOO cute too!)
I just loved these little guys so much! Such a fun idea.
Very nice, creative!! Inspiring! Easy peasy for the neighborhood kids to make!!! I do like the one w/ the silver snowflake in the center. TFS!! ChelleBee
I love all of them! When my kids were younger we used to make ornaments, now each year I look forward to the ones my grand-kids make for me.
These are so pretty!
Would be great out of sheet music too! Pinning it!
Yes, sheet music would be beautiful too! Thanks for pinning. 🙂
Coincidence??? Becca and I made a bunch of these last night. They worked about perfect for school assignment to make “recycled” ornaments for the Festival of Trees. I used regular white paper instead of cardstock and it folded a lot easier (although maybe didn’t look as fancy). Also I used hot glue (instead of craft glue) to make the accordion circle so I didn’t have to wait as long for it to dry. Thanks for the cute idea! I like your variations.
P.S. When I brought home the “discarded” Louis Lamour library books Rebecca said “We can’t rip these, these look like good books!” (but we did it anyway).
I love it! I’ve always wondered about those accordian-type circles… thanks for the tute!
Have a happy and safe holiday
Love it! So creative and easy to make! Thanks for sharing!
Happy Thanksgiving to you and your family
Love, Brenda
Thanks so much Brenda! Hope you have a wonderful Thanksgiving as well. 🙂