I feel like I’m under some kind of craft supply curse. I am having the hardest time finding basic supplies, and it is starting to be really weird. First Home Depot was out of my favorite spray paint. Then Robert’s was out of magnets and flat glass marbles. Then Walmart was out of sponge brushes and E-6000 glue.
What the heck is going on in the craft world? Is there some huge convention somewhere that I am missing out on? Who is buying all my supplies!?! Whoever you are, you are putting a serious cramp in my style. But know this, you CANNOT STOP ME! Even when it takes me months (which it did) I will find what I need. So take that! Nothing can stand in the way of me and a craft project!
Like this one. After shopping at every craft store within a 60 mile radius, I was finally able to find what I needed to make these:
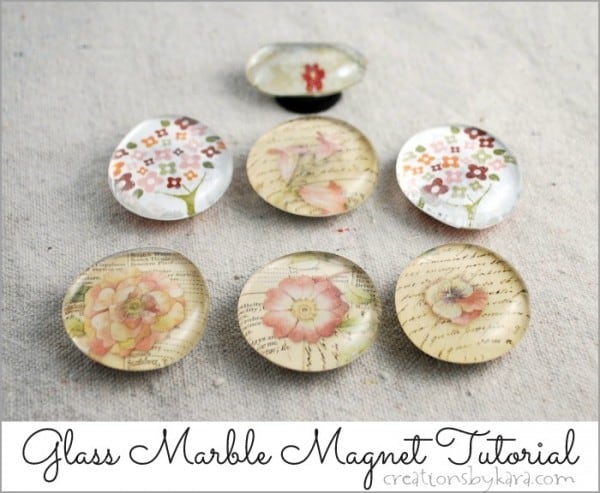
Glass Marble Magnets. The crazy thing is, it took me so long to find everything that by the time I had it all, I could no longer find the online tutorial. I thought I had saved it in a folder, but apparently not. Darn. I knew it was from a blog that I visit frequently, but I couldn’t find it.
Finally I decided to just wing it. But lucky for you, I took plenty of pictures so I could do my own tutorial. It looks like there are lots of steps, but really this is easy peasy.
Glass Marble Magnet Tutorial
Here is what you will need to begin:
 -E-6000
-Super Glue
-Strong Round Magnets
-Flat Round Glass Marbles
-Scrapbook Paper
-Scissors
Make sure you use good quality magnets, not the flat strip kind. They stink! I know from personal experience. I used mod podge, but I bet any good craft glue would work. I used E-6000 because it is a super strong permanent glue. I know those magnets are on for good!
Instructions:
Step 1: Place the glass marble over your paper, situating it how you like it. Cut out the rough shape.

Step 2: Holding the marble and the paper firmly, cut around the edge of the paper so it is just slightly smaller than the marble. Please ignore my ugly man hands. Thank you.


Step 3: Use a toothpick to spread a thin layer of Superglue on the flat side of the glass marble.

Step 4: Press the paper firmly over the back of the marble. Make sure the paper is centered. Turn it over and spread out any air bubbles if you need to.


Step 5: Apply a small amount of E-6000 to the back of your magnet. Press the magnet firmly onto the back of your glass tile. You will be able to wiggle it around till it is in the center.

Step 8: Let the glue dry for about an hour. Then hang up your beautiful new magnets.
Stand back and admire your work!
There are so many possibilities with these. You could use fabric, wallpaper, monograms, or tiny photos. I can’t wait to make more of them. They are super quick and easy. The hardest part was taking all the photos, and you won’t have to do that!
Have fun with this tutorial, and if you happen to make some magnets, I would love to hear about it. Happy crafting!
Hola , ❤️ que bonito ! Todo lo que haces ,eres genial , 😃 muchas gracias
Very beautiful! I love to do these two. But I cannot find the irregular shaped glass you used. Anyone know where I can get it? By the way I just started so it wasn’t me took all the supplies in 2009 haha!
Julie, I got mine at a local craft store, but I think at the time they were also available at the dollar store. Good luck!
Lovely glass marble tutorial. 🙂 Thank you so much for showing. 🙂
The patterns you used are beautiful!!! I’ve done these with leftover bits of scrapbook paper and they are always so fun to give away! To make your life easier, next time you make these you don’t have to pre cut the paper. Just brush a bunch of mod podge on the back of the marble and stick it to the sheet over whatever part you want to capture. It dries really fast and as soon as they are totally translucent you can just use a sharp pair of scissors and cut around the edge. The first time I did it I didn’t think it would look clean but it’s surprisingly effective.
That is a great tip Raewyn, I’ll have to try it next time!
Hi. I love these magnets. I was wondering if you Mod Podged the back of the paper before you glued on the magnet or did you glue the magnet straight to the back of the paper.
I love these magnets… I’ve made magnets like these for all the holidays–super easy and cute! I’d love if you’d link these up to Sew Woodsy today!
Nice & simple….great idea!