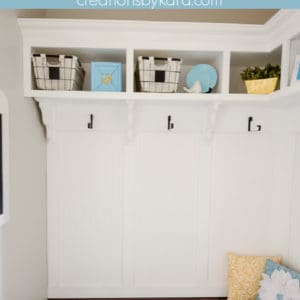
Corner Mudroom Bench with Cubbies – add beauty and function to your mudroom by adding cubbies. This step by step tutorial will show you how!
In part 1, I showed you how to build your Corner Bench. Don’t forget to check out that post first! (So sorry it took so long to get this second post up and running. Among other things, we had a wedding and a fire evacuation, and life has just been insane.)

DIY Mudroom Bench with Cubbies Tutorial
Tools I Used:
Miter Saw
Table Saw (can use a circular saw with a Kreg Rip-Cut)
Ryobi Brad Nailer with 1 1/2″ nails
Kreg Jig and screws
Power Drill (I have a Ryobi)
Home Right Paint Sprayer (you can just use paintbrushes and/or a roller)
Supplies:
4″ x 8″ sheets of Primed Beadboard
Paint (I used Behr Premium Plus Ultra Bright White in a satin finish)
1/2″ x 3 1/2″ Primed MDF Trim (for the board and batten)
1/2″ x 7 1/4″ Primed MDF Trim (for the board and batten header)
4′ x 8′ sheets of 3/4 MDF (for cubbie top, bottom, dividers, and back support brackets)
Wood corbels
Primer
Paint (I used Behr Premium Plus Ultra Bright White satin finish)
3″ screws for attaching cubby shelves to wall
Instructions:
Adding Beadboard and Trim to Mudroom Bench
1-Paint your beadboard. I used my HomeRight Paint Sprayer, and it was a HUGE timesaver. I like to lay my pieces horizontally after spraying to eliminate any drips while the paint dries. I just placed them on cardboard boxes.

2-Cut your beadboard with a table saw to fit your wall space. It only needs to come to the bottom of the upper cubby shelf. (We cut ours tall enough to come up to the top of the cubby, but found out we didn’t need it that tall.)
3- Use a brad nailer to attach the beadboard to the wall.
TIP: Decide where your vertical trim pieces are going to go, and mark the lines on the wall. Nail down those lines, and when you hang the trim it will cover your nail holes.

4- Use a nail gun to attach the board and batten and header to the beadboard.

Adding Upper Cubbies to Mudroom Bench
1-Prime and paint your corbels.
2- Hang the corbels flush with the top of the board and batten header. The corbels I used have metal hangers on the back. To make sure I was putting the screws in exactly the right place on the wall, I used a piece of waxed paper to mark the holes on the back of the corbels. Then I held the waxed paper up to the wall and marked where the screws should go.

I ended up with corbels that were perfectly aligned. Hooray!

3- Build your upper cubbies following the tutorial in Part 1. You will build the top cubbies exactly the same way you built the bottom bench, except for one difference. You do not need two pieces of MDF along the bottom. Just use one piece so the cubby shelf isn’t too heavy.
4- Find the studs in your wall and screw your cubby shelves to the wall through the support brackets using 3″ screws.

5- Cut pieces of beadboard to fit inside your cubbies, and use the nail gun to attach them to the support brackets at the back.

6- Paint your trim pieces and attach them to the front of the cubbies the same way you did on the bottom bench.
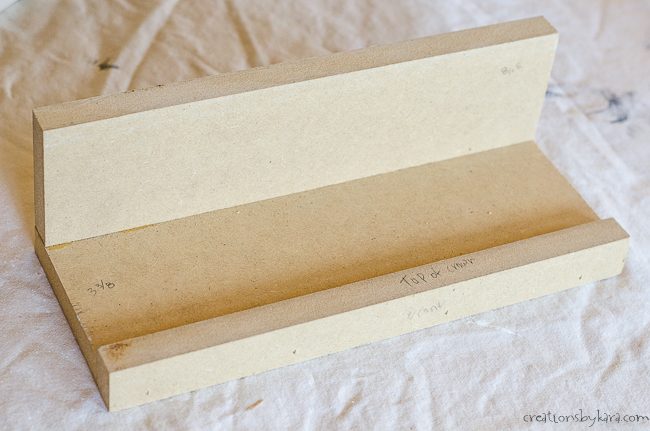
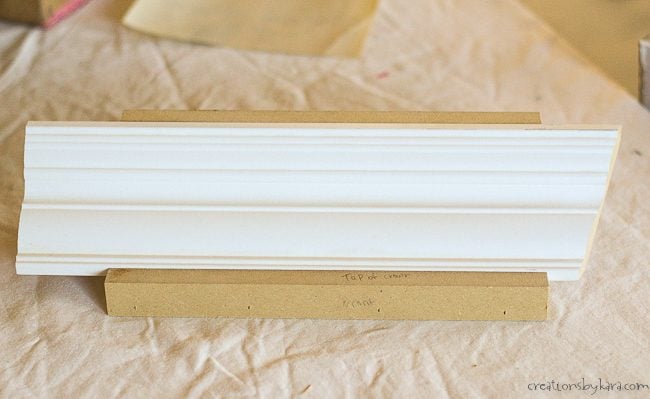
Adding Crown Molding to the Cubby Shelves
7- Attach an angled gusset to the top of the shelf. The purpose of the gusset is to have a larger solid surface to attach the crown molding to. Since the crown doesn’t touch the ceiling, you need this support. We found this video helpful for showing the process.

8-Cut your crown molding pieces. It can be tricky, but this tutorial was extremely helpful. We built the crown molding guide he suggested, and it was a lifesaver!!
Basically you build a little tray with scrap wood.
You place your crown molding in so that it sits at an angle.
Then you use the guide to hold your crown in place while you cut it with the chop saw.
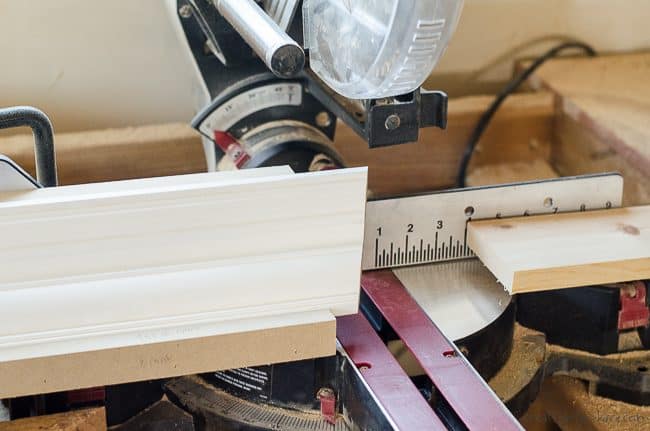 (mine is upside down in the photo, but you get the idea)
After all the crown molding is installed, fill all the holes with spackling and caulk all the seams like you did for the bottom half. Let it all dry, then touch it up with paint.

Now you get to add hooks and accessorize! I needed to be able to hang clothes hangers, so we used plant pot hangers instead of regular hooks. It works like a charm!

I got the wire baskets online at Walmart, everything else is handmade or thrifted. You can download your own Wash & Dry sign on my site. It comes in a multitude of colors.

I cannot tell you how much I love this space now! It is not only beautiful, it is so functional. It’s great having all the extra storage space.
And best of all, I now have somewhere to hang all the clean clothes until they get put away.

Here are a few more of my DIY projects:
- Staircase Makeover with Paint and Stain
- How to Install Beadboard Wallpaper
- DIY Reading Nook
- Choosing Gray Paint Color (Repose Gray)
- Staining Wood
- Spray Paint for Fireplace
- Painted Chandelier
- DIY Shutters
Looks like a great project. Question – will the 7 1/4″ header board hold the weight of whatever is hung from your hangers as well as the corbels when it is fastened with just brad nails? It seems like a more sturdy board would need to be screwed to the studs for that specific piece.
So excited to do this in our mudroom, it will be inky 4 cubbies 2 each side. Just curious what this cost for budget reasons. Thanks again
So sorry, I can’t remember. It was hard for us to keep track of the cost since we were using a lot of materials left over from other projects. And I am the worst at remembering numbers. 🙁
Love this! My husband has done a great job with ours! Where did you find those hooks? Love them and can’t find anything similar anywhere!!
I found mine at Joann (the fabric and craft store). They are actually made for holding hanging plant baskets, so you could probably find something similar at Home Depot or Lowes. Good luck!
Since this is for a mud room, is there any worry about using MDF? I thought this would swell if it gets water on it.
Since the MDF is painted, I haven’t had any problems at all with swelling.If the room flooded, it might be a problem, but with normal use it has been just fine. 🙂
Hi Kara! I just read your post & I think what you were able to do is amazing! We also have an empty “builder” corner mudroom and I think your plans would fit the bill! Could you tell me what height & depth you used for the upper cubbies? And what distance did you install the upper cubbies from the bench? Any help would be great, thanks!
Hello! How much did this project cost? I love it!
How many total sheets of MDF did you purchase for both benches and cubbies?
I can’t remember, but we actually had some left over from another project. The amount you need will depend on how large your bench and cubbies are, so that’s why I didn’t add an exact number to the post.
That turned out Great! I love it! Such a great use of space!
I love how much extra storage you got out of the room and it’s so functional and pretty!!!
I can’t wait to show my husband how easy this is!!
LOVE how much storage is in this mud room! Looks amazing!
Thanks so much Jamielyn!
Amazing! It makes me feel like I could pull this off myself. Maybe?
Yes, you could! It’s faster with two people working, but the only time you really need two people is when you are installing the upper cubbies.
That looks amazing! I totally want to do that in our house now. I’ll have to show my husband.
Hopefully he’s on board. It’s definitely much easier with two people!
So cute! I love it! I want to do this at my house!
Thanks Rachael! I am so glad we finally got it finished. 🙂