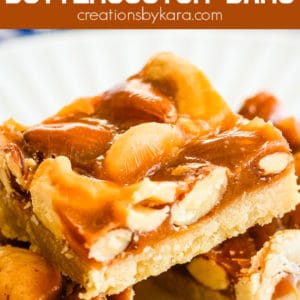
Butterscotch Mixed Nut Bars – sweet, salty, ooey gooey, and crunchy all rolled into one scrumptious treat. These bars are super easy to make, and taste amazing!
I’m always up for a good sweet and salty combo, and these bars fit the bill. I also love White Chocolate Popcorn and Saltine Toffee. So hard to resist!

If you are looking for an ooey gooey treat that is sweet, salty and whips together in a snap, this is the recipe for you. I first tried these last year at a neighbor’s house. She had made them with cashews. They were fabulous, so I got the recipe. Then I proceeded to lose it.
Imagine my joy when I found it stuck back behind my stack of cookbooks. I had some mixed nuts that needed to be used up, so I threw them in. I think these would be yummy with just about any type of nuts.
HOW TO MAKE BUTTERSCOTCH MIXED NUT BARS
Ingredients needed:
- all purpose flour
- brown sugar
- salt
- butter, softened to room temperature
- lightly salted, roasted mixed nuts
- butterscotch chips
- corn syrup
Make a simple crust of flour, brown sugar, salt, and butter, and press in bottom of a 9×13″ pan. Bake at 350 for 5-10 minutes.

Sprinkle nuts over the hot crust. I like to use lightly salted roasted mixed nuts, but you can use any kind of nuts you want. Melt together some butterscotch baking chips and corn syrup and pour over the nuts. Try to drizzle on as evenly as possible, but don’t worry too much. As it cooks, it spreads out into all the nooks and crannies.
Return to the oven and bake till bubbly. After you pour on the topping, it cooks very quickly, so make sure you don’t burn your mixed nut bars. Loosen the edges of the bars from the pan with a spatula while they are warm. Cool for about 30 minutes, then cut into bars.

Mixed nut bars are easiest to cut after they have cooled for a few minutes but haven’t totally set up yet. If they get to cold, they are harder to cut through. I like to spray my knife with non stick spray, or rinse and dry it in between cuts.
Although they cut best after cooling, they are pretty tasty while still slightly warm and still ooey gooey. Any way you serve them, they are sure to be a hit!

HOW TO STORE BUTTERSCOTCH NUT BARS:
-Nut bars will keep for 3-5 days at room temperature if kept in an airtight container. If you want them to last a few more days, you can store them in the refrigerator. They will need to sit at room temperature for several minutes before serving, or they are too hard to bite into.
I don’t recommend freezing the bars, the nuts tend to soften up.
Pro Tips:
-I like to run a metal spatula around the edge of the bars while they are still hot. It prevents the edges from sticking to the pan as the bars cool.
-To make the bars easier to remove, and save on cleanup, line the baking pan with parchment paper before you spray it with non stick spray.
VARIATIONS:
- As I mentioned above, you can switch out the nuts. They are delicious with just cashews, but I think they would also be good with almonds, macadamia nuts, or even pecans. Just make sure you use roasted, salted nuts for best flavor.
- Drizzle with some melted chocolate after cutting them into bars.
- Try sprinkling coarse salt on top of the bars when they come out of the oven for an extra punch of salty flavor.
- If you are opposed to corn syrup, you can try replacing it with honey. The flavor will change slightly, but they should still be tasty.

MORE TASTY RECIPES FOR NUT LOVERS:
MORE BAR COOKIES:
- Maraschino Cherry Cookie Bars
- Jan Hagel (Cinnamon Sugar Bars)
- Butterscotch Bars
- Pistachio Bars
- Chocolate Chip Cookie Bars
- Churro Cheesecake Bars
- Peanut Butter Chip Bars
- Chocolate Chip Toffee Bars
- Lemon Brownies

Butterscotch Mixed Nut Bars Recipe

Mixed Nut Bars with Butterscotch
Equipment
Ingredients
- 1 ½ cups flour
- ¾ cup brown sugar
- ¼ tsp salt
- 10 Tbsp butter softened to room temperature
- 11 oz can nuts of your choice
- 1 cup butterscotch chips
- ½ cup corn syrup
Instructions
- Pre-heat oven to 350 degrees. Spray a 9x13" pan with non stick spray; set aside.
- Mix flour, brown sugar, salt, and butter in a small bowl till crumbly.
- Press crumbs into the bottom the prepared pan. Bake at 350 for 10 minutes.
- Sprinkle nuts over hot crust. Melt butterscotch chips and corn syrup together in a glass bowl in the microwave; pour over the nuts.
- Bake for about 5-10 more minutes, or till bubbly. Let cool for 30-60 minutes before cutting.
Notes
Nutrition
(originally published 11/10/2009, updated January 2020)
The 3/4 c syrup was not enough for 9×13 pan. I used total of 1c and full 12oz bag of chips. Is there a process for melting syrup and chips together? Starting by heating one or other first?
It may not seem like enough when you pour it over, but it spreads as it bakes. But of course it’s fine to use more if you like things on the sweeter side. I just pour them both in the bowl and melt them together. Hope that helps.
Sooooooo delicious and easy!
You always have the yummiest treats! Looking forward to making this!
Yum! These are so delicious! My husband loved these! He was so excited to try these!
Wow! These look so amazing and super easy to make. 🙂 🙂
Does the butter need to be melt for the crust?
No, it doesn’t need to be melted, just softened.