A cooked custard base makes this the creamiest Peppermint Ice Cream you will ever eat! Yes, it takes a bit more time, but it is guaranteed never to be icy – every batch is creamy down to the last spoonful.
If you love the candy cane ice cream that you can find in stores during the holidays, you may be frustrated that it’s only available during the winter months. Well, start smiling, because you can make it yourself all year long!

BEST PEPPERMINT ICE CREAM
I’ve tried other recipes for candy cane ice cream that just call for stirring together the ingredients and pouring them in an ice cream maker. They were good, but this recipe is AMAZING!
Four egg yolks in the custard not only give the ice cream a silky smooth texture, they also keep it from freezing too hard. It is smooth and creamy and scoops up perfectly, even after several days in the freezer.
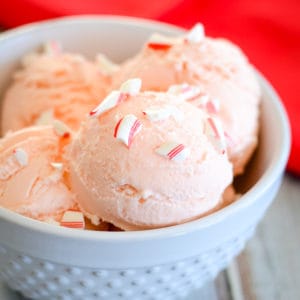
By the time I got around to taking photos, my peppermint stick ice cream had been in the freezer for almost a week, and I just took it out and scooped it directly into my dish. No defrosting, no thawing on the counter, no waiting. Perfect!
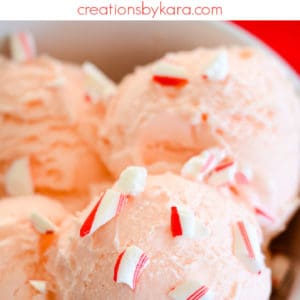
Crushed candy canes (or starlight mints) not only add a sweet mint flavor to the ice cream, they also give it a pale pink color. Sprinkling it with crushed candy canes makes it so pretty!
Trust me, it is better than any store bought ice cream out there!

If you love homemade ice cream, this pink peppermint ice cream is a must try recipe. It’s cool, creamy, and so refreshing. I’ve even had people who don’t like candy canes tell me how much they love it!
(To skip my tips and tricks and just see the full recipe card, scroll to the bottom of the post.)
HOW TO MAKE PEPPERMINT ICE CREAM
INGREDIENTS NEEDED:
- milk (I used 2%, but you could also use whole milk.)
- egg yolks (I used large eggs.)
- granulated sugar (plain white sugar)
- salt (A bit of salt boosts the flavor of the ice cream.)
- heavy cream (or whipping cream)
- vanilla extract
- peppermint extract (Make sure you use peppermint extract, not just mint extract!)
- crushed peppermint candies (I used 12 candy canes, but you can use starlight mint candies instead. They are available all year long in the candy aisle.)
- Start by making a simple custard. Whisk together the milk, egg yolks, sugar, and salt in a heavy saucepan till very smooth. Cook and stir over medium heat till mixture barely comes to a boil, or until it reaches 160°.
- Remove custard from heat and place the saucepan in a sink or container full of ice water to cool it down quickly, stirring often. (Or cover and place it in the refrigerator for a few hours.)
- Crush the candy canes in a ziplock bag with a rolling pin, or in a food processor or blender.
- When mixture is cool, stir in the cream, vanilla, peppermint extract, and 3/4 cup of the crushed candies. I like to reserve the biggest chunks for garnishing the ice cream.
- Chill ice cream base for several hours or overnight, then freeze in an ice cream maker according to manufacturer’s instructions.
- Put ice cream into an airtight container and ripen in the freezer for 2-3 hours. Serve with reserved candy cane pieces.

HOW TO STORE HOMEMADE ICE CREAM
MORE RECIPES FOR MINT FANS:
MORE HOMEMADE ICE CREAM:
- Milky Way Ice Cream
- Lemon Blueberry Ice Cream
- Peanut Butter Cup Ice Cream
- Blueberry Ice Cream
- Mud Pie Ice Cream
- Butterfinger Ice Cream
- French Vanilla Ice Cream
- Chocolate Cookie Dough Ice Cream
PEPPERMINT ICE CREAM RECIPE
Peppermint Ice Cream
Ingredients
- 1 ½ cup milk
- 4 egg yolks
- ¾ cup sugar
- ⅛ tsp salt
- 2 cups heavy cream
- 2 tsp vanilla extract
- ½ tsp peppermint extract
- 1 cup of crushed peppermint candies divided (12 candy canes, or a 5.7 ounce box)
Instructions
- Whisk milk, yolks, sugar, and salt in a saucepan till smooth.
- Cook over medium heat, stirring constantly, till mixture just starts to come to a boil.
- Remove from heat and chill. (I place the pan in an ice bath to speed the process.)
- If desired, pour mixture through a fine meshed strainer to remove any lumps.
- Add cream, vanilla, extract, and 3/4 cup of the crushed candies.
- Chill for several hours or overnight.
- Freeze in ice cream freezer according to manufacturer’s instructions.
- Place in freezer for about 2-3 hours to "ripen". Serve with remaining crushed candies sprinkled on top of the ice cream.
Notes
- For a more pronounced peppermint flavor, feel free to add more peppermint extract.
- If you want your ice cream to have chunks of candy in it, you can add the crushed candy canes during the last minute or two of the churning process.
Nutrition
(originally published Dec 9, 2008, updated November 2020)
Peppermint stick ice cream is cool and refreshing all year long, but it is especially wonderful during the holiday season!
How many cups does this recipe make? I know it says 6 servings, but how much is a serving?
It makes about a quart, but it varies depending on how much air your ice cream maker incorporates as it churns.
Oh my Kara you always have the greatest recipes thank you so much. Also you have a great smile. Best wishes Barbara
Aw, thank you so much Barb, that just made my day! 🙂